php 5.3 → 5.6
$ cat /etc/redhat-release CentOS release 6.8 (Final)デフォルトは php 5.3。...▼
<?php $html=<<<EOT <!DOCTYPE html> <html> <head> <meta http-equiv="Content-Type" content="text/html; charset=utf-8"> </head> <body> <div class="chapter" name="1章 ようこそ"> <h1>1-1節 remix.asia</h1> <div class="paragraph"> 文章 </div><!-- paragraph --> </div><!-- chapter --> <div class="chapter" name="2章 言語"><!-- 章の数だけ繰り返し --> <h1>2-1節 HTML</h1> <div class="paragraph"> HyperText Markup Language... </div><!-- paragraph --> <h1>2-2節 PHP</h1> <div class="paragraph"><!-- 節の数だけ繰り返し --> Hypertext Preprocessor </div><!-- paragraph --> </div><!-- chapter --> </body> </html> EOT; $dom = new DOMDocument( '1.0', 'UTF-8' ); if( false == $dom->loadHTML( $html ) ){ return;//error }の前提で...▼
sudo yum install --enablerepo=remi --enablerepo=remi-php56 php-devel少なくとも
sudo yum install libuuid-develと
sudo pecl install -a uuidが必要。さらに エディタ
sudo vi /etc/php.ini起動し[PHP]ブロックの最後に
extension=uuid.soを追加。
sudo service httpd restart最後に apache再起動。
php -r "echo uuid_create(UUID_TYPE_RANDOM);"コマンドラインでUUID生成確認。
sudo yum install libuuid-develと
sudo pecl install uuidでOK.。
https://code.google.com/archive/p/google-api-php-client/ https://code.google.com/archive/p/google-api-php-client/downloads●Google API Client Libraries PHP (Beta)のインストール
× → git clone -b v1-master https://github.com/google/google-api-php-client.gitカレントリポジトリも同様で、これに含まれる /src/Google/Service/~ も別リポジトリに枝分かれ。
$ sudo yum remove php-*●リポジトリ追加
$ sudo rpm -ivh http://ftp-srv2.kddilabs.jp/Linux/distributions/fedora/epel/6/x86_64/epel-release-6-8.noarch.rpm $ sudo rpm -Uvh http://rpms.famillecollet.com/enterprise/remi-release-6.rpm●リポジトリを指定してphp5.6.*インストール
$ sudo yum install --enablerepo=remi-php56 php php-devel php-pdo php-mysql php-mbstring php-pear●webサーバ再起動
$ sudo service httpd restart
$ sudo yum list installed | grep httpdなければ apache をインストール
$ yum info httpd $ sudo yum -y install httpd自動起動になっていなければ自動起動に変更
$ chkconfig --list | grep httpd $ sudo chkconfig httpd onapacheを起動してウェルカムページ確認
$ sudo service httpd starthttp://IPアドレス/ ●apacheグループに所属させる
$ sudo usermod -G apache admin $ id admin●データベースサーバー
$ sudo yum list installed | grep mysql-servermysql Ver 14.14 Distrib 5.1.73 なければ mysql をインストール
$ yum info mysql-server $ sudo yum -y install mysql-servermysql-server を起動
$ sudo service mysqld start初期化(パスワード・匿名ユーザー・サンプルデータベースの扱いなど)
$ sudo mysql_secure_installation
NOTE: RUNNING ALL PARTS OF THIS SCRIPT IS RECOMMENDED FOR ALL MySQL SERVERS IN PRODUCTION USE! PLEASE READ EACH STEP CAREFULLY! In order to log into MySQL to secure it, we'll need the current password for the root user. If you've just installed MySQL, and you haven't set the root password yet, the password will be blank, so you should just press enter here. Enter current password for root (enter for none): (初めてならエンター) OK, successfully used password, moving on... Setting the root password ensures that nobody can log into the MySQL root user without the proper authorisation. Set root password? [Y/n] Y New password: ***************** Re-enter new password: ***************** Password updated successfully! Reloading privilege tables.. ... Success! By default, a MySQL installation has an anonymous user, allowing anyone to log into MySQL without having to have a user account created for them. This is intended only for testing, and to make the installation go a bit smoother. You should remove them before moving into a production environment. : Remove anonymous users⁄ [Y/n] Y : Disallow root login remotely⁄ [Y/n] Y : Remove test database and access to it⁄ [Y/n] Y : Reload privilege tables now⁄ [Y/n] Y :日本語を使用する場合
sudo mv /etc/my.cnf /etc/my.cnf.org sudo cp /etc/my.cnf.org /etc/my.cnf sudo vi /etc/my.cnf[mysqld]のブロックに最低限
[mysqld] default-character-set = utf8 skip-character-set-client-handshake character-set-server = utf8 collation-server = utf8_general_ci init-connect = SET NAMES utf8を追記してmysqlサーバ再起動
$ sudo service mysqld restart自動起動になっていなければ自動起動に変更
$ chkconfig --list | grep mysql $ sudo chkconfig mysqld onmysql-server へログオン確認
$ mysql --show-warnings -u root -p●php php エンジンがインストールされているか確認
$ sudo yum list installed | grep phpPHP 5.3.3 (cli) (built: Dec 11 2013 03:29:57) Copyright (c) 1997-2010 The PHP Group Zend Engine v2.3.0, Copyright (c) 1998-2010 Zend Technologies なければ php をインストール
$ sudo yum info php $ sudo yum -y install phpphp でマルチバイトストリング(日本語)を使えるか確認
$ sudo yum list installed | grep php-mbstringなければ php-mbstring をインストール
$ yum info php-mbstring $ sudo yum -y install php-mbstringphp から mysql を使用できるか確認
$ sudo yum list installed | grep php-mysqlなければ php-mysql をインストール
$ yum info php-mysql $ sudo yum -y install php-mysql確認用の phpファイルを作成
$ vi /var/www/html/info.php $ cat /var/www/html/info.php <?php phpinfo(); ?>apacheを再起動
$ sudo service httpd restartここまで apache の設定ファイル httpd.conf はデフォルトのまま。
$ sudo yum list installed | grep php-pearなければ pear をインストール
$ yum info php-pear $ sudo yum -y install php-pearpear バージョン確認
$ pear version $ pear listPEAR Version: 1.9.5 下記のエラー
$ sudo pear install -a ethna/ethna Notice: Array to string conversion in PEAR/REST/13.php on line 80 PHP Notice: Array to string conversion in /usr/share/pear/PEAR/REST/13.php on line 80 Warning: Invalid argument supplied for foreach() in PEAR/REST/13.php on line 84 PHP Warning: Invalid argument supplied for foreach() in /usr/share/pear/PEAR/REST/13.php on line 84 PHP Fatal error: Cannot use string offset as an array in /usr/share/pear/PEAR/REST/10.php on line 263を解決するため
$ sudo pear clear-cachepear アップグレード
$ sudo pear list-upgrades $ sudo pear upgrade pear●phpフレームワーク ethna ethna をインストール
$ sudo pear channel-discover pear.ethna.jp $ sudo pear install -a ethna/ethnaethna コマンド確認
$ ethna -v Ethna 2.5.0 (using PHP 5.3.3)
$ sudo yum list installed | grep php-gd $ yum info php-gd $ sudo yum -y install php-gd
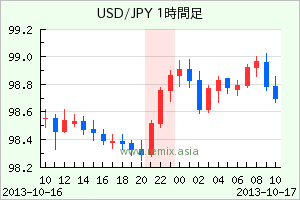
fieldSQLite2 だと
tables"."fieldで異なる為。 ※ DBを切り替えたらキャッシュを削除しないと混乱する。
フォームメールのASPをシンプルで自分好みにカスタマイズ可能にした フォームメール Version1.0 をベクターに公開。
formmail.zip 41,227 bytes
MD5 53a1a1026ac10dd3cd863e6598a845f4
サンプルは https://remix.asia/service/formmail/ 。
動作環境条件:PHPのフレームワーク ethna が動作する環境
html,css が分かればデザインはもちろん、入力項目や構成を変更するにはphp ソースを拡張。
[root@www ~]# yum list installed | grep php-pear●なければ pear をインストール
[root@www ~]# yum info php-pear [root@www ~]# yum -y install php-pear●pear バージョン確認
[toshi@www ~]$ pear version PEAR Version: 1.4.9 PHP Version: 5.1.6 Zend Engine Version: 2.1.0 Running on: Linux www.remix.asia 2.6.18-308.4.1.el5 #1 SMP Tue Apr 17 17:08:00 EDT 2012 x86_64 [root@www ~]# pear list Installed packages, channel pear.php.net: ========================================= Package Version State Archive_Tar 1.3.1 stable Console_Getopt 1.2 stable DB 1.7.14 stable PEAR 1.4.9 stable Structures_Graph 1.0.4 stable XML_RPC 1.5.0 stable XML_Util 1.2.1 stable●pear バージョンが低ければアップグレード
[root@www ~]# pear list-upgrades [root@www ~]# pear upgrade-all [root@www ~]# pear upgrade --force Archive_Tar [root@www ~]# pear upgrade --force Console_Getopt [root@www ~]# pear upgrade --force PEAR●ethna インストール設定
[root@www ~]# pear channel-discover pear.ethna.jp Adding Channel "pear.ethna.jp" succeeded Discovery of channel "pear.ethna.jp" succeeded●ethna インストール
[root@www ~]# pear install -a ethna/ethna WARNING: "pear/DB" is deprecated in favor of "pear/MDB2" downloading Ethna-2.5.0.tgz ... Starting to download Ethna-2.5.0.tgz (241,455 bytes) ..................................................done: 241,455 bytes downloading DB-1.7.14.tgz ... Starting to download DB-1.7.14.tgz (133,103 bytes) ...done: 133,103 bytes downloading Smarty-2.6.26.tgz ... Starting to download Smarty-2.6.26.tgz (67,946 bytes) ...done: 67,946 bytes downloading simpletest-1.1.0.tgz ... Starting to download simpletest-1.1.0.tgz (289,405 bytes) ...done: 289,405 bytes install ok: channel://pear.ethna.jp/Ethna-2.5.0 install ok: channel://pear.php.net/DB-1.7.14 install ok: channel://pear.ethna.jp/Smarty-2.6.26 install ok: channel://pear.ethna.jp/simpletest-1.1.0
[root@www ~]# yum list installed | grep php●なければ php をインストール
[root@www ~]# yum info php [root@www ~]# yum -y install php●php でマルチバイトストリング(日本語)を使えるか確認
[root@www ~]# yum list installed | grep php-mbstring [root@www ~]# yum info php-mbstring●なければ php-mbstring をインストール
[root@www ~]# yum -y install php-mbstring●php から mysql を使用できるか確認
[root@www ~]# yum list installed | grep php-mysql [root@www ~]# yum info php-mysql●なければ php-mysql をインストール
[root@www ~]# yum -y install php-mysql
$ethnadb =& $this->backend->getDB(); $peardb =& $ethnadb->db; $stmt = "UPDATE tablename SET fieldname=? WHERE cd IN(?)"; $cd = array( 10, 20, 30 ); $data = array( 99, $cd ); if( DB::isError( $peardb->query( $stmt, $data ) ) ){ : } $this->backend->log( LOG_INFO, '[%s]', $peardb->last_query );残念ながら、プレイスフォルダの IN(?) に配列は展開されない。
$cd = implode( ',', $cd );が必要。
{$smarty.server.PHP_SELF}
{$smarty.server.argv}
{$smarty.server.argc}
{$smarty.server.GATEWAY_INTERFACE}
{$smarty.server.SERVER_ADDR}
{$smarty.server.SERVER_NAME}
{$smarty.server.SERVER_SOFTWARE}
{$smarty.server.SERVER_PROTOCOL}
{$smarty.server.REQUEST_METHOD}
{$smarty.server.REQUEST_TIME}
{$smarty.server.QUERY_STRING}
{$smarty.server.DOCUMENT_ROOT}
{$smarty.server.HTTP_ACCEPT}
{$smarty.server.HTTP_ACCEPT_CHARSET}
{$smarty.server.HTTP_ACCEPT_ENCODING}
{$smarty.server.HTTP_ACCEPT_LANGUAGE}
{$smarty.server.HTTP_CONNECTION}
{$smarty.server.HTTP_HOST}
{$smarty.server.HTTP_REFERER}
{$smarty.server.HTTP_USER_AGENT}
{$smarty.server.HTTPS}
{$smarty.server.REMOTE_ADDR}
{$smarty.server.REMOTE_HOST}
{$smarty.server.REMOTE_PORT}
{$smarty.server.SCRIPT_FILENAME}
{$smarty.server.SERVER_ADMIN}
{$smarty.server.SERVER_PORT}
{$smarty.server.SERVER_SIGNATURE}
{$smarty.server.PATH_TRANSLATED}
{$smarty.server.SCRIPT_NAME}
{$smarty.server.REQUEST_URI}
{$smarty.server.PHP_AUTH_DIGEST}
{$smarty.server.PHP_AUTH_USER}
{$smarty.server.PHP_AUTH_PW}
{$smarty.server.AUTH_TYPE}
{$smarty.server.PATH_INFO}
http://php.net/manual/ja/reserved.variables.server.php
前回の「MD5値をキーとして利用する」の md5() 第2パラメータによるバイナリデータの取得は、php5が必要。
php4では使えない md5( '001', true ); の代替方法は
md5( '001' );
↓
dc5c7986daef50c1e02ab09b442ee34f
128ビット(16バイト)データを1バイト2桁の16進表記で32桁の文字列。
もう少し短く表現するには
パスワードなどはMD5で保存し、ログイン時は入力値のMD5と保存値を照合して認証。
MD5値は128ビット(16進表記で32文字)の有限長の為、異なる入力値で同じMD5値の可能性があるはず。
数学的な値は検証していないが、次のような工夫を施す。